
PyTest Tutorial: What is PyTest? (with Examples)
 Editorial Team
⚡ Smart Summary
Pytest is a Python testing framework that helps you write simple, scalable tests for databases, APIs, and user interfaces. It supports fixtures, parameterization, markers, parallel runs, and detailed assertion reporting, from basic unit tests to complex functional tests.
Pytest is one of the most widely used testing frameworks in the Python ecosystem. It keeps test code short and readable, discovers tests automatically, and grows from a first assertion into a full test suite for databases, APIs, and user interfaces. The sections below walk through installation, assertions, fixtures, markers, parameterization, and parallel runs with practical examples.
What is Pytest?
Pytest is a testing framework that lets you write test code using the Python programming language. It helps you write simple and scalable test cases for databases, APIs, and even user interfaces. Pytest is used mainly for writing tests for APIs, and it scales from simple unit tests to complex functional tests.
Why use Pytest?
Some of the advantages of pytest are:
- Very easy to start with, because of its simple and clean syntax.
- Can run tests in parallel.
- Can run a specific test or a subset of tests.
- Automatically detects tests.
- Can skip tests.
- Open source.
How to install Pytest
Following is the process to install pytest:
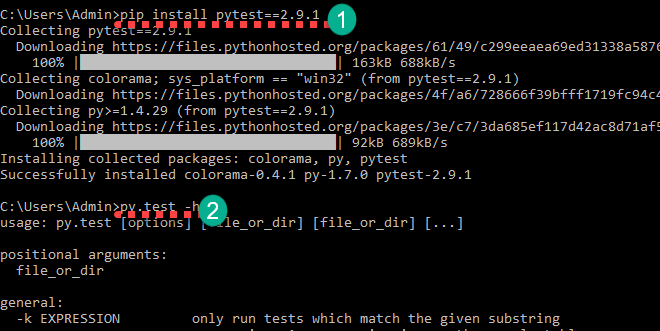
Step 1) You can install pytest with the command below.
pip install pytest==2.9.1
Once the installation is complete, you can confirm it with the following command.
py.test -h
This will display the help.
First Basic Pytest Example
Now, you will learn how to use pytest with a basic pytest example.
Create a folder study_pytest. You are going to create the test files inside this folder. Please navigate to that folder in your command line. Create a file named test_sample1.py inside the folder.

Add the below code into it and save.
import pytest
def test_file1_method1():
	x=5
	y=6
	assert x+1 == y,"test failed"
	assert x == y,"test failed"
def test_file1_method2():
	x=5
	y=6
	assert x+1 == y,"test failed"
Run the test using the command below.
py.test
You will get the output as follows.
test_sample1.py F.
============================================== FAILURES ========================================
____________________________________________ test_sample1 ______________________________________
    def test_file1_method1():
    	x=5
    	y=6
       	assert x+1 == y,"test failed"
>      	assert x == y,"test failed"
E       AssertionError: test failed
E       assert 5 == 6
test_sample1.py:6: AssertionError
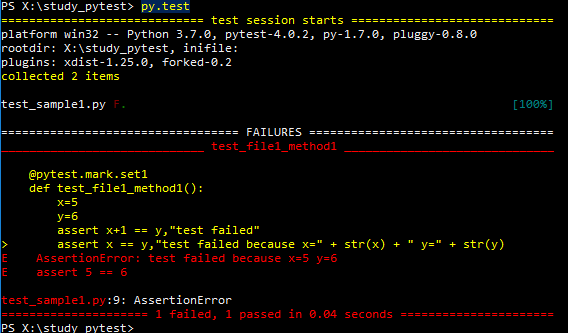
Here, in test_sample1.py F., the letter F says failure and the dot (.) says success. In the failures section, you can see the failed method(s) and the line of failure. Here x==y means 5==6, which is false.
Next, you will learn about assertions in pytest.
Assertions in Pytest
Pytest assertions are checks that return either a True or False status. In pytest, if an assertion fails in a test method, then execution of that method is stopped there. The remaining code in that test method is not executed, and pytest continues with the next test method.
Pytest assert examples:
assert "hello" == "Hai" is an assertion failure.
assert 4==4 is a successful assertion
assert True is a successful assertion
assert False is an assertion failure.
Consider the following.
assert x == y,"test failed because x=" + str(x) + " y=" + str(y)
Place this code in test_file1_method1() instead of the assertion below.
assert x == y,"test failed"
Running the test will give the failure as AssertionError: test failed x=5 y=6.
How Pytest Identifies the Test Files and Test Methods
By default, pytest identifies only the file names starting with test_ or ending with _test as the test files. We can mention other file names explicitly, though (explained later). Pytest requires the test method names to start with test. All other method names are ignored, even if we explicitly ask to run those methods.
See some examples of valid and invalid pytest file names.
test_login.py - valid
login_test.py - valid
testlogin.py -invalid
logintest.py -invalid
Note: Yes, we can explicitly ask pytest to pick testlogin.py and logintest.py.
See some examples of valid and invalid pytest test methods.
def test_file1_method1(): - valid
def testfile1_method1(): - valid
def file1_method1(): - invalid
Note: Even if we explicitly mention file1_method1(), pytest will not run this method.
Run Multiple Tests From a Specific File and Multiple Files
Currently, inside the folder study_pytest, we have a file test_sample1.py. Suppose we have multiple files, say test_sample2.py and test_sample3.py. To run all the tests from all the files in the folder and subfolders, we need to just run the pytest command.
py.test
This will run all the file names starting with test_ and the file names ending with _test in that folder and the subfolders under that folder.
To run tests only from a specific file, we can use py.test <filename>.
py.test test_sample1.py
Run a Subset of the Entire Test With Pytest
Sometimes we do not want to run the entire test suite. Pytest allows us to run specific tests. We can do it in two ways:
- Grouping of test names by substring matching.
- Grouping of tests by markers.
We already have test_sample1.py. Create a file test_sample2.py and add the below code into it.
def test_file2_method1():
	x=5
	y=6
	assert x+1 == y,"test failed"
	assert x == y,"test failed because x=" + str(x) + " y=" + str(y)
def test_file2_method2():
	x=5
	y=6
	assert x+1 == y,"test failed"
So we have the following currently.
• test_sample1.py
• test_file1_method1()
• test_file1_method2()
• test_sample2.py
• test_file2_method1()
• test_file2_method2()
Option 1) Run tests by substring matching
Here, to run all the tests having method1 in their name, we have to run the command below.
py.test -k method1 -v
-k <expression> is used to represent the substring to match
-v increases the verbosity
So running py.test -k method1 -v will give you the following result.
test_sample2.py::test_file2_method1 FAILED
test_sample1.py::test_file1_method1 FAILED

============================================== FAILURES ==============================================
_________________________________________ test_file2_method1 _________________________________________
    def test_file2_method1():
    	x=5
    	y=6
       	assert x+1 == y,"test failed"
>      	assert x == y,"test failed because x=" + str(x) + " y=" + str(y)
E       AssertionError: test failed because x=5 y=6
E       assert 5 == 6
test_sample2.py:5: AssertionError

_________________________________________ test_file1_method1 _________________________________________
    @pytest.mark.only
    def test_file1_method1():
    	x=5
    	y=6
       	assert x+1 == y,"test failed"
>      	assert x == y,"test failed because x=" + str(x) + " y=" + str(y)
E       AssertionError: test failed because x=5 y=6
E       assert 5 == 6
test_sample1.py:8: AssertionError

================================= 2 tests deselected by '-kmethod1' ==================================
=============================== 2 failed, 2 deselected in 0.02 seconds ===============================
Here you can see, towards the end, 2 tests deselected by ‘-kmethod1’, which are test_file1_method2 and test_file2_method2.
Try running with various combinations like the following.
py.test -k method -v - will run all the four methods
py.test -k methods -v – will not run any test as there is no test name matches the substring 'methods'
Option 2) Run tests by markers
Pytest allows us to set various attributes for the test methods using pytest markers, @pytest.mark. To use markers in the test file, we need to import pytest into the test files. Here we will apply different marker names to the test methods and run specific tests based on the marker names. We can define the markers on each test name by using the following.
@pytest.mark.<name>.
We are defining markers set1 and set2 on the test methods, and we will run the test using the marker names. Update the test files with the following code.
test_sample1.py
import pytest
@pytest.mark.set1
def test_file1_method1():
	x=5
	y=6
	assert x+1 == y,"test failed"
	assert x == y,"test failed because x=" + str(x) + " y=" + str(y)

@pytest.mark.set2
def test_file1_method2():
	x=5
	y=6
	assert x+1 == y,"test failed"
test_sample2.py
import pytest
@pytest.mark.set1
def test_file2_method1():
	x=5
	y=6
	assert x+1 == y,"test failed"
	assert x == y,"test failed because x=" + str(x) + " y=" + str(y)

@pytest.mark.set1
def test_file2_method2():
	x=5
	y=6
	assert x+1 == y,"test failed"
We can run the marked test with the command below.
py.test -m <name>
-m <name> mentions the marker name
Run py.test -m set1. This will run the methods test_file1_method1, test_file2_method1, and test_file2_method2. Running py.test -m set2 will run test_file1_method2.
Run Tests in Parallel With Pytest
Usually, a test suite will have multiple test files and hundreds of test methods, which will take a considerable amount of time to execute. Pytest allows us to run tests in parallel. For that, we need to first install pytest-xdist by running the command below.
pip install pytest-xdist

You can run the tests now with the following command.
py.test -n 4
Here, -n <num> runs the tests using multiple workers. In the above command, there will be four workers to run the tests.
Pytest Fixtures
Fixtures are used when we want to run some code before every test method. So, instead of repeating the same code in every test, we define fixtures. Usually, fixtures are used to initialize database connections, pass the base URL, and so on. A method is marked as a pytest fixture by marking it with the following.
@pytest.fixture
A test method can use a pytest fixture by mentioning the fixture as an input parameter. Create a new file test_basic_fixture.py with the following code.
import pytest
@pytest.fixture
def supply_AA_BB_CC():
	aa=25
	bb =35
	cc=45
	return [aa,bb,cc]

def test_comparewithAA(supply_AA_BB_CC):
	zz=35
	assert supply_AA_BB_CC[0]==zz,"aa and zz comparison failed"

def test_comparewithBB(supply_AA_BB_CC):
	zz=35
	assert supply_AA_BB_CC[1]==zz,"bb and zz comparison failed"

def test_comparewithCC(supply_AA_BB_CC):
	zz=35
	assert supply_AA_BB_CC[2]==zz,"cc and zz comparison failed"
Here:
- We have a fixture named supply_AA_BB_CC. This method returns a list of three values.
- We have three test methods comparing against each of the values.
Each of the test functions has an input argument whose name matches an available fixture. Pytest then invokes the corresponding fixture method, and the returned values are stored in the input argument, here the list [25,35,45]. The list items are then used in the test methods for the comparison. Now run the test and see the result.
py.test test_basic_fixture
test_basic_fixture.py::test_comparewithAA FAILED
test_basic_fixture.py::test_comparewithBB PASSED
test_basic_fixture.py::test_comparewithCC FAILED

============================================== FAILURES ==============================================
_________________________________________ test_comparewithAA _________________________________________
supply_AA_BB_CC = [25, 35, 45]
    def test_comparewithAA(supply_AA_BB_CC):
    	zz=35
>   	assert supply_AA_BB_CC[0]==zz,"aa and zz comparison failed"
E    AssertionError: aa and zz comparison failed
E    assert 25 == 35
test_basic_fixture.py:10: AssertionError

_________________________________________ test_comparewithCC _________________________________________
supply_AA_BB_CC = [25, 35, 45]
    def test_comparewithCC(supply_AA_BB_CC):
    	zz=35
>   	assert supply_AA_BB_CC[2]==zz,"cc and zz comparison failed"
E    AssertionError: cc and zz comparison failed
E    assert 45 == 35
test_basic_fixture.py:16: AssertionError
================================= 2 failed, 1 passed in 0.05 seconds =================================
The test test_comparewithBB passes, since zz=BB=35, and the remaining two tests fail.
The fixture method has a scope only within the test file where it is defined. If we try to access the fixture in some other test file, we will get an error saying fixture ‘supply_AA_BB_CC’ not found for the test methods in the other files.
To use the same fixture against multiple test files, we create fixture methods in a file called conftest.py. Let us see this with the below pytest example. Create three files, conftest.py, test_basic_fixture.py, and test_basic_fixture2.py, with the following code.
conftest.py
import pytest
@pytest.fixture
def supply_AA_BB_CC():
	aa=25
	bb =35
	cc=45
	return [aa,bb,cc]
test_basic_fixture.py
import pytest
def test_comparewithAA(supply_AA_BB_CC):
	zz=35
	assert supply_AA_BB_CC[0]==zz,"aa and zz comparison failed"

def test_comparewithBB(supply_AA_BB_CC):
	zz=35
	assert supply_AA_BB_CC[1]==zz,"bb and zz comparison failed"

def test_comparewithCC(supply_AA_BB_CC):
	zz=35
	assert supply_AA_BB_CC[2]==zz,"cc and zz comparison failed"
test_basic_fixture2.py
import pytest
def test_comparewithAA_file2(supply_AA_BB_CC):
	zz=25
	assert supply_AA_BB_CC[0]==zz,"aa and zz comparison failed"

def test_comparewithBB_file2(supply_AA_BB_CC):
	zz=25
	assert supply_AA_BB_CC[1]==zz,"bb and zz comparison failed"

def test_comparewithCC_file2(supply_AA_BB_CC):
	zz=25
	assert supply_AA_BB_CC[2]==zz,"cc and zz comparison failed"
Pytest will look for the fixture in the test file first, and if it is not found, it will look in the conftest.py. Run the test with py.test -k test_comparewith -v to get the result below.
test_basic_fixture.py::test_comparewithAA FAILED
test_basic_fixture.py::test_comparewithBB PASSED
test_basic_fixture.py::test_comparewithCC FAILED
test_basic_fixture2.py::test_comparewithAA_file2 PASSED
test_basic_fixture2.py::test_comparewithBB_file2 FAILED
test_basic_fixture2.py::test_comparewithCC_file2 FAILED
Pytest Parameterized Test
The purpose of parameterizing a test is to run a test against multiple sets of arguments. We can do this with @pytest.mark.parametrize. We will see this with the below pytest example. Here we will pass three arguments to a test method. This test method will add the first two arguments and compare the result with the third argument. Create the test file test_addition.py with the below code.
import pytest
@pytest.mark.parametrize("input1, input2, output",[(5,5,10),(3,5,12)])
def test_add(input1, input2, output):
	assert input1+input2 == output,"failed"
Here the test method accepts three arguments: input1, input2, and output. It adds input1 and input2 and compares the sum against the output. Let us run the test with py.test -k test_add -v and see the result.
test_addition.py::test_add[5-5-10] PASSED
test_addition.py::test_add[3-5-12] FAILED
============================================== FAILURES ==============================================
__________________________________________ test_add[3-5-12] __________________________________________
input1 = 3, input2 = 5, output = 12
    @pytest.mark.parametrize("input1, input2, output",[(5,5,10),(3,5,12)])
    def test_add(input1, input2, output):
>   	assert input1+input2 == output,"failed"
E    AssertionError: failed
E    assert (3 + 5) == 12
test_addition.py:5: AssertionError
You can see the tests ran two times, one checking 5+5 ==10 and the other checking 3+5 ==12.
test_addition.py::test_add[5-5-10] PASSED
test_addition.py::test_add[3-5-12] FAILED
Pytest Xfail and Skip Tests
There will be some situations where we do not want to execute a test, or a test case is not relevant at a particular time. In those situations, we have the option to xfail the test or skip the tests. The xfailed test will be executed, but it will not be counted as part of the failed or passed tests. There will be no traceback displayed if that test fails. We can xfail tests using @pytest.mark.xfail. Skipping a test means that the test will not be executed. We can skip tests using @pytest.mark.skip. Edit the test_addition.py with the below code.
import pytest
@pytest.mark.skip
def test_add_1():
	assert 100+200 == 400,"failed"

@pytest.mark.skip
def test_add_2():
	assert 100+200 == 300,"failed"

@pytest.mark.xfail
def test_add_3():
	assert 15+13 == 28,"failed"

@pytest.mark.xfail
def test_add_4():
	assert 15+13 == 100,"failed"

def test_add_5():
	assert 3+2 == 5,"failed"

def test_add_6():
	assert 3+2 == 6,"failed"
Here:
- test_add_1 and test_add_2 are skipped and will not be executed.
- test_add_3 and test_add_4 are xfailed. These tests will be executed and will be part of the xfailed (on test failure) or xpassed (on test pass) tests. There will not be any traceback for failures.
- test_add_5 and test_add_6 will be executed, and test_add_6 will report failure with a traceback while test_add_5 passes.
Execute the test with py.test test_addition.py -v and see the result.
test_addition.py::test_add_1 SKIPPED
test_addition.py::test_add_2 SKIPPED
test_addition.py::test_add_3 XPASS
test_addition.py::test_add_4 xfail
test_addition.py::test_add_5 PASSED
test_addition.py::test_add_6 FAILED

============================================== FAILURES ==============================================
_____________________________________________ test_add_6 _____________________________________________
    def test_add_6():
>   	assert 3+2 == 6,"failed"
E    AssertionError: failed
E    assert (3 + 2) == 6
test_addition.py:24: AssertionError

================ 1 failed, 1 passed, 2 skipped, 1 xfailed, 1 xpassed in 0.07 seconds =================
Results in XML Format
We can create test results in XML format, which we can feed to Continuous Integration servers for further processing. This can be done with the command py.test test_sample1.py -v –junitxml=”result.xml”. The result.xml will record the test execution result. Find a sample result.xml below.
<?xml version="1.0" encoding="UTF-8"?>
<testsuite errors="0" failures="1" name="pytest" skips="0" tests="2" time="0.046">
   <testcase classname="test_sample1" file="test_sample1.py" line="3" name="test_file1_method1" time="0.001384973526">
     <failure message="AssertionError:test failed because x=5 y=6 assert 5 ==6">
    @pytest.mark.set1
    def test_file1_method1():
    	x=5
    	y=6
       	assert x+1 == y,"test failed"
>      	assert x == y,"test failed because x=" + str(x) + " y=" + str(y)
E       AssertionError: test failed because x=5 y=6
E       assert 5 == 6
         test_sample1.py:9: AssertionError
    </failure>
   </testcase>
   <testcase classname="test_sample1" file="test_sample1.py" line="10" name="test_file1_method2" time="0.000830173492432" />
</testsuite>
From <testsuite errors=”0″ failures=”1″ name=”pytest” skips=”0″ tests=”2″ time=”0.046″> we can see a total of two tests, of which one has failed. Below that, you can see the details regarding each executed test under the <testcase> tag.
Pytest Framework for Testing an API
Now we will create a small pytest framework to test an API. The API used here is a free one from reqres.in. This website simply provides a testable API and does not store our data. Here we will write some tests for the following:
- Listing some users.
- Login with users.
Create the below files with the code given. First, conftest.py has a fixture that will supply the base URL for all the test methods.
import pytest
@pytest.fixture
def supply_url():
	return "https://reqres.in/api"
Next, test_list_user.py contains the test methods for listing valid and invalid users.
- test_list_valid_user tests for a valid user fetch and verifies the response.
- test_list_invaliduser tests for an invalid user fetch and verifies the response.
import pytest
import requests
import json
@pytest.mark.parametrize("userid, firstname",[(1,"George"),(2,"Janet")])
def test_list_valid_user(supply_url,userid,firstname):
	url = supply_url + "/users/" + str(userid)
	resp = requests.get(url)
	j = json.loads(resp.text)
	assert resp.status_code == 200, resp.text
	assert j['data']['id'] == userid, resp.text
	assert j['data']['first_name'] == firstname, resp.text

def test_list_invaliduser(supply_url):
	url = supply_url + "/users/50"
	resp = requests.get(url)
	assert resp.status_code == 404, resp.text
Then, test_login_user.py contains the test methods for testing the login functionality.
- test_login_valid tests the valid login attempt with an email and password.
- test_login_no_password tests the invalid login attempt without passing a password.
- test_login_no_email tests the invalid login attempt without passing an email.
import pytest
import requests
import json
def test_login_valid(supply_url):
	url = supply_url + "/login/"
	data = {'email':'test@test.com','password':'something'}
	resp = requests.post(url, data=data)
	j = json.loads(resp.text)
	assert resp.status_code == 200, resp.text
	assert j['token'] == "QpwL5tke4Pnpja7X", resp.text

def test_login_no_password(supply_url):
	url = supply_url + "/login/"
	data = {'email':'test@test.com'}
	resp = requests.post(url, data=data)
	j = json.loads(resp.text)
	assert resp.status_code == 400, resp.text
	assert j['error'] == "Missing password", resp.text

def test_login_no_email(supply_url):
	url = supply_url + "/login/"
	data = {}
	resp = requests.post(url, data=data)
	j = json.loads(resp.text)
	assert resp.status_code == 400, resp.text
	assert j['error'] == "Missing email or username", resp.text
Run the test using py.test -v and see the result as follows.
test_list_user.py::test_list_valid_user[1-George] PASSED
test_list_user.py::test_list_valid_user[2-Janet] PASSED
test_list_user.py::test_list_invaliduser PASSED
test_login_user.py::test_login_valid PASSED
test_login_user.py::test_login_no_password PASSED
test_login_user.py::test_login_no_email PASSED
Update the tests and try various outputs.
